
Create a course from a manual with the AI assistant
How to turn a manual into a course in Studio with the AI course assistant: choose sources, enter key facts, check the outline and create the lessons.
You have a manual and want a course from it. The AI course assistant takes you from the sources to finished lessons in four steps. A fifth step is optional. The AI delivers a draft. Check and revise it in the editor afterwards.
Before you start
- Warning for an existing course: when the assistant applies its draft, it replaces the title, the description and all lessons of the course with the draft. The app does not make a backup for this. It is best to use the assistant in a new, empty course. The Course title from step 2 also replaces the title from the dialog where you created the course.
- You need the Studio rights to create courses, to edit courses and to use AI functions. Without the right for AI, Create with AI is not there.
- The manual must be in the knowledge base and processed. You can also upload it in the first step. A document that is still being processed shows Still processing.
- The assistant uses AI credit of your workspace, also for prefilling and for creating the outline. When it is used up, creation stops with a message (see below).
- Until creation starts, only your browser stores your entries. If you switch devices, you start over. From the step Create on, the state is on the server.
How to create the course
-
In the course overview, click Create new and choose Create with AI. Enter a Title, check the Source language and click Create course. You can still change the source language for 24 hours. The course is created and opened in the AI course assistant.
In an existing course, open the assistant on the course start page (course outline) through AI assistant and Course assistant. The button is not in the lesson editor. Note the warning above.
-
Step Sources: under Which sources should AI use? you choose what the AI draws on. The options are Existing lesson content as reference (on by default), Knowledge base wiki, Knowledge base documents, Your own text (optional), Source URLs (optional) and Files (optional). Uploaded files go into the knowledge base of the course and are available once they are processed. The AI gets addresses from Source URLs (optional) as text only. The app does not fetch the pages. If you leave everything empty, the AI works only with the topic and learning objective from step 2 and with general knowledge. You can continue in this step without choosing anything.
-
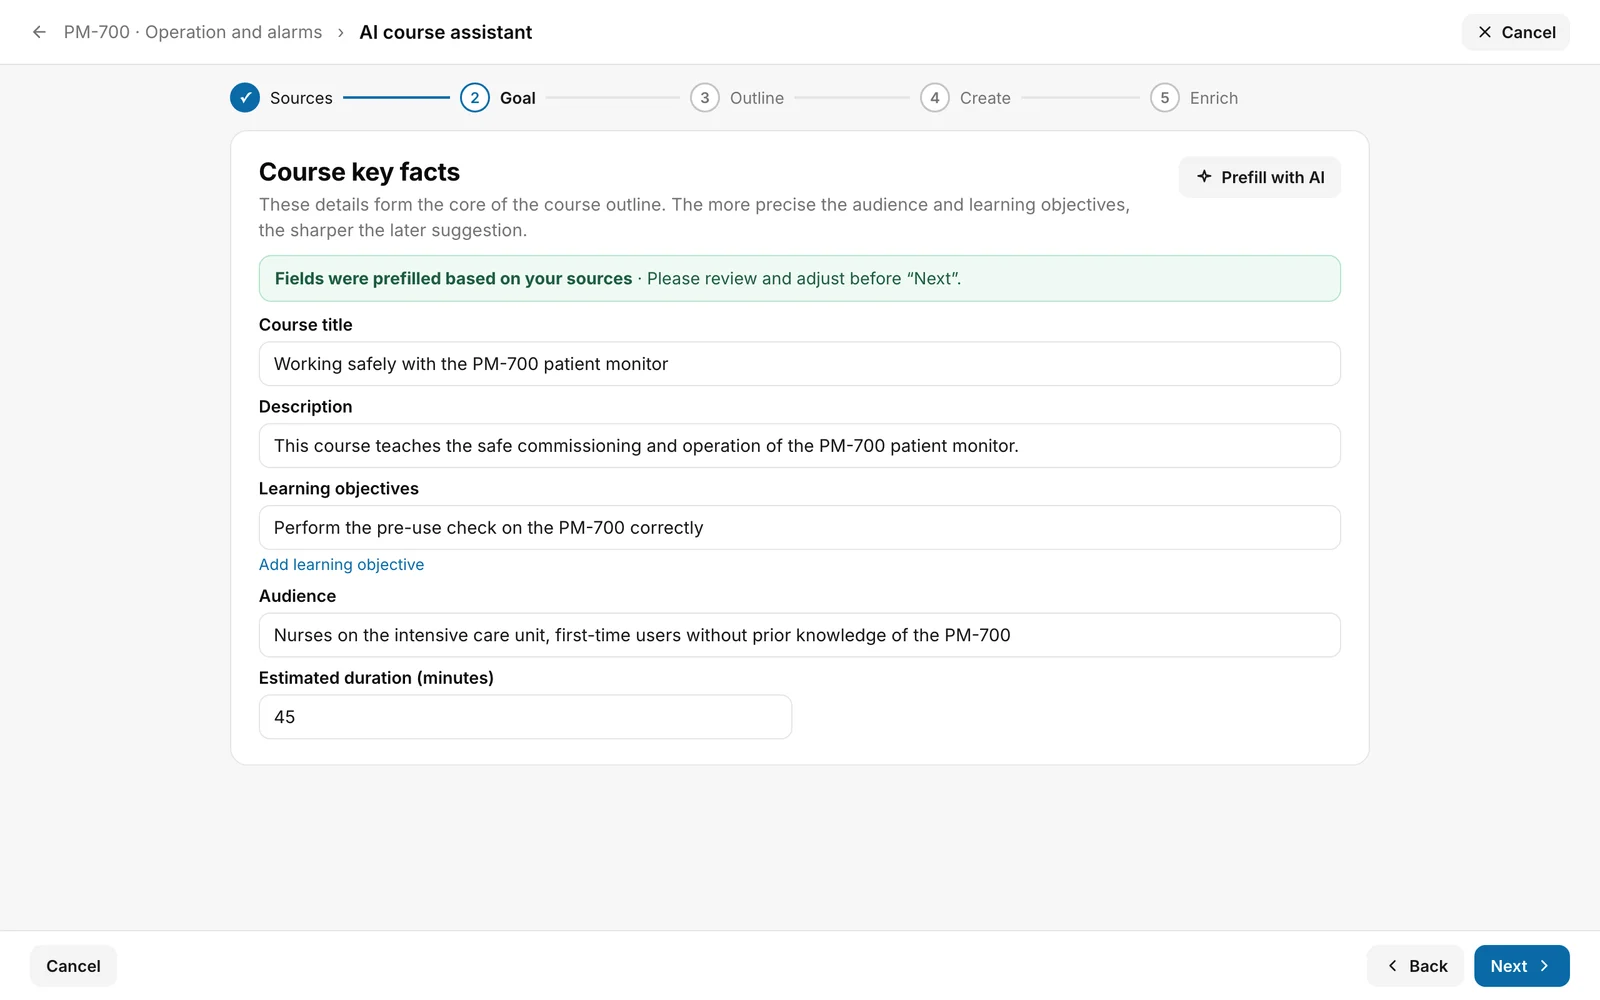
Step Goal: if you chose documents or the wiki and the fields are still empty, the AI suggests the key facts itself when the step opens (“Fields were prefilled based on your sources”). This can also change the Estimated duration (minutes) (otherwise 60). Check everything. The fields are: Course title, Description, Learning objectives (with Add learning objective), Audience and Estimated duration (minutes). Title, audience and at least one learning objective are required. Without them, Next stays disabled.
The button Prefill with AI suggests the key facts again. It is missing if no suitable source is chosen. If the fields are already filled, the app asks before overwriting. After a source change it is called Prefill again with new source. For the wiki, the switched-on box is enough. Without a selection the whole wiki applies.
-
Step Outline: click Create course outline with AI. According to the app, this usually takes 30 to 90 seconds. With Or start with an empty course outline you start with a general framework without AI instead.
-
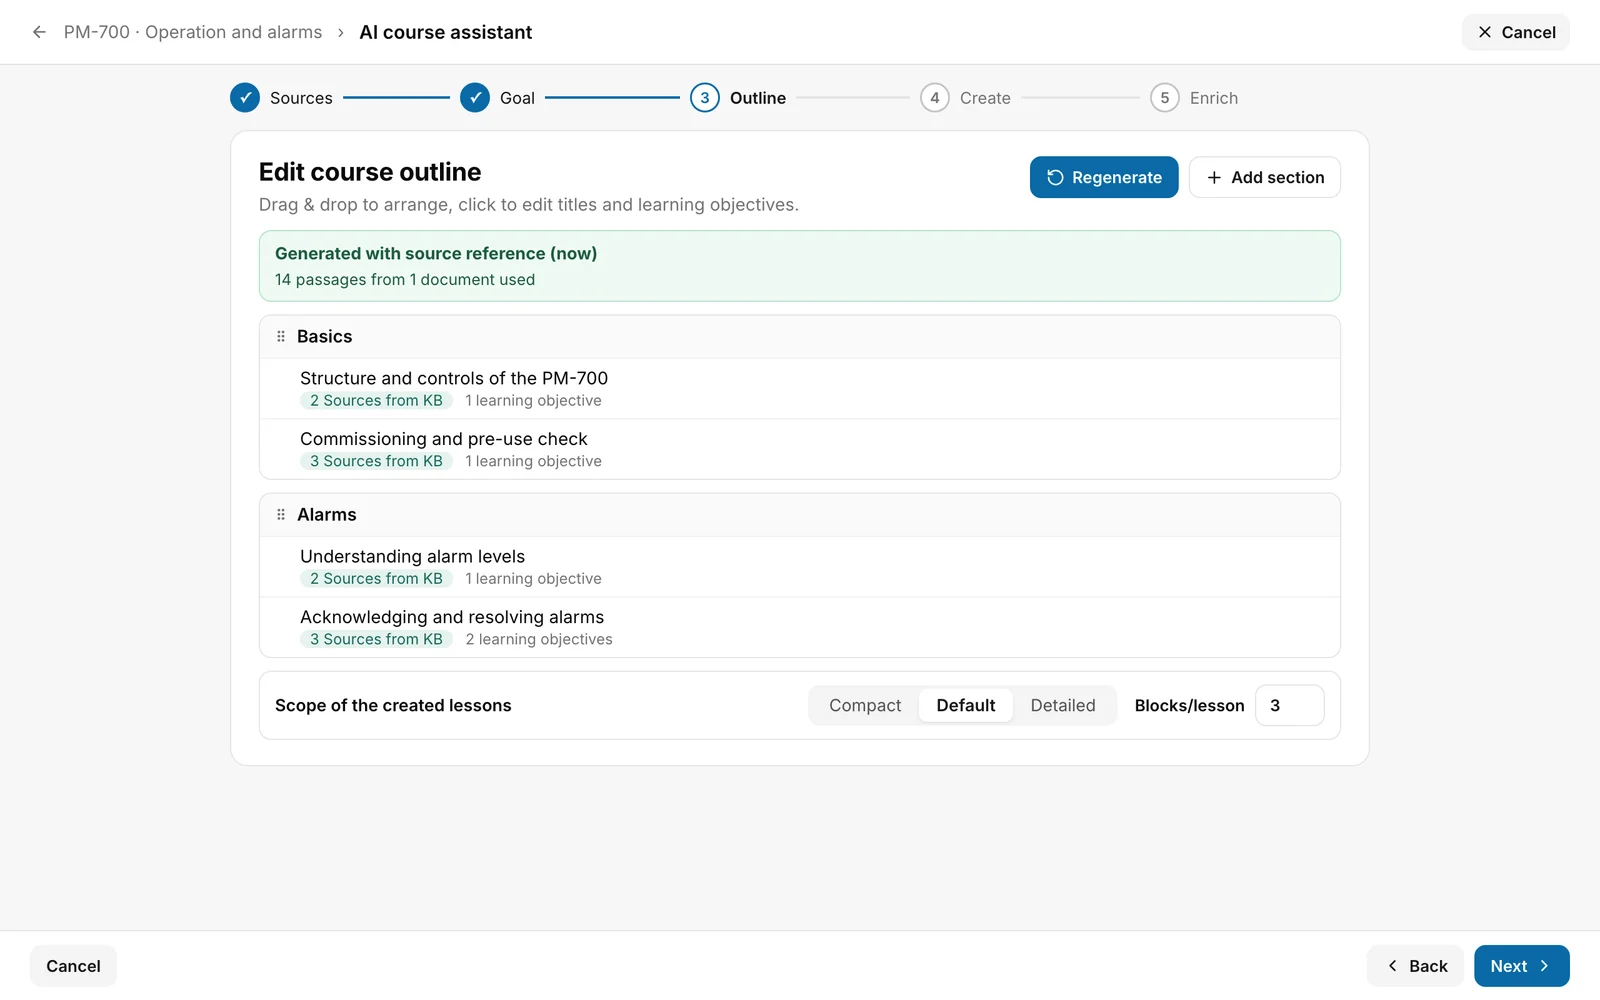
Check the outline. The banner says how it was created:
- “Generated with source reference” or “Generated from the curated wiki”: the outline is based on your sources.
- “Generated without source reference”: the content comes from general model knowledge and can have gaps.
- “Topic does not match your sources”: the AI searched the sources but based no lesson on them. Align the title and learning objectives in step 2 more closely with the content of the documents, then choose Regenerate.
- “Fallback content from local preview”: the AI returned nothing usable. The sections are a generic placeholder without AI and without a link to the knowledge base. Choose Regenerate.
Lessons with a source reference show “Sources from KB” with the number. Lessons without a label are instructional scaffolding, for example an introduction.
-
Adjust the structure: arrange sections and lessons by drag and drop, click titles and objectives to edit them, choose Add section or Add lesson. Deleting a section also deletes its lessons. Regenerate replaces the whole outline including your changes and asks first. For Next you need at least one lesson. If you go back and change a source in step 1, the outline is gone and you create it again.
-
Under Scope of the created lessons, choose Compact, Default or Detailed. This sets the target under Blocks/lesson to 2, 3 or 5. You can choose any number from 2 to 6 yourself. With thin sources the AI may deviate.
-
Step Create: check the overview and click Create all lessons. The assistant creates the blocks one after another and saves each finished block as a draft. Each lesson shows Waiting, Running, Done, Error or Cancelled. Only when all lessons are done does the assistant add them to the course together. The assistant creates only text, list, accordion, tabs and process. Images and knowledge checks come from the step Enrich.
-
With Next you reach the optional step Enrich. Analyze enrichment checks the lessons for missing images, interactive structures and short knowledge checks. You insert suggestions with Insert into course; there are also batch actions. In the last step the button at the bottom is called Go to course.
-
With Go to course editor (in the step Create) you leave the assistant and review the lessons in the editor. If the course has no style yet, the app sets an AI style suggestion automatically after creation. The design check may offer “View n notes”.
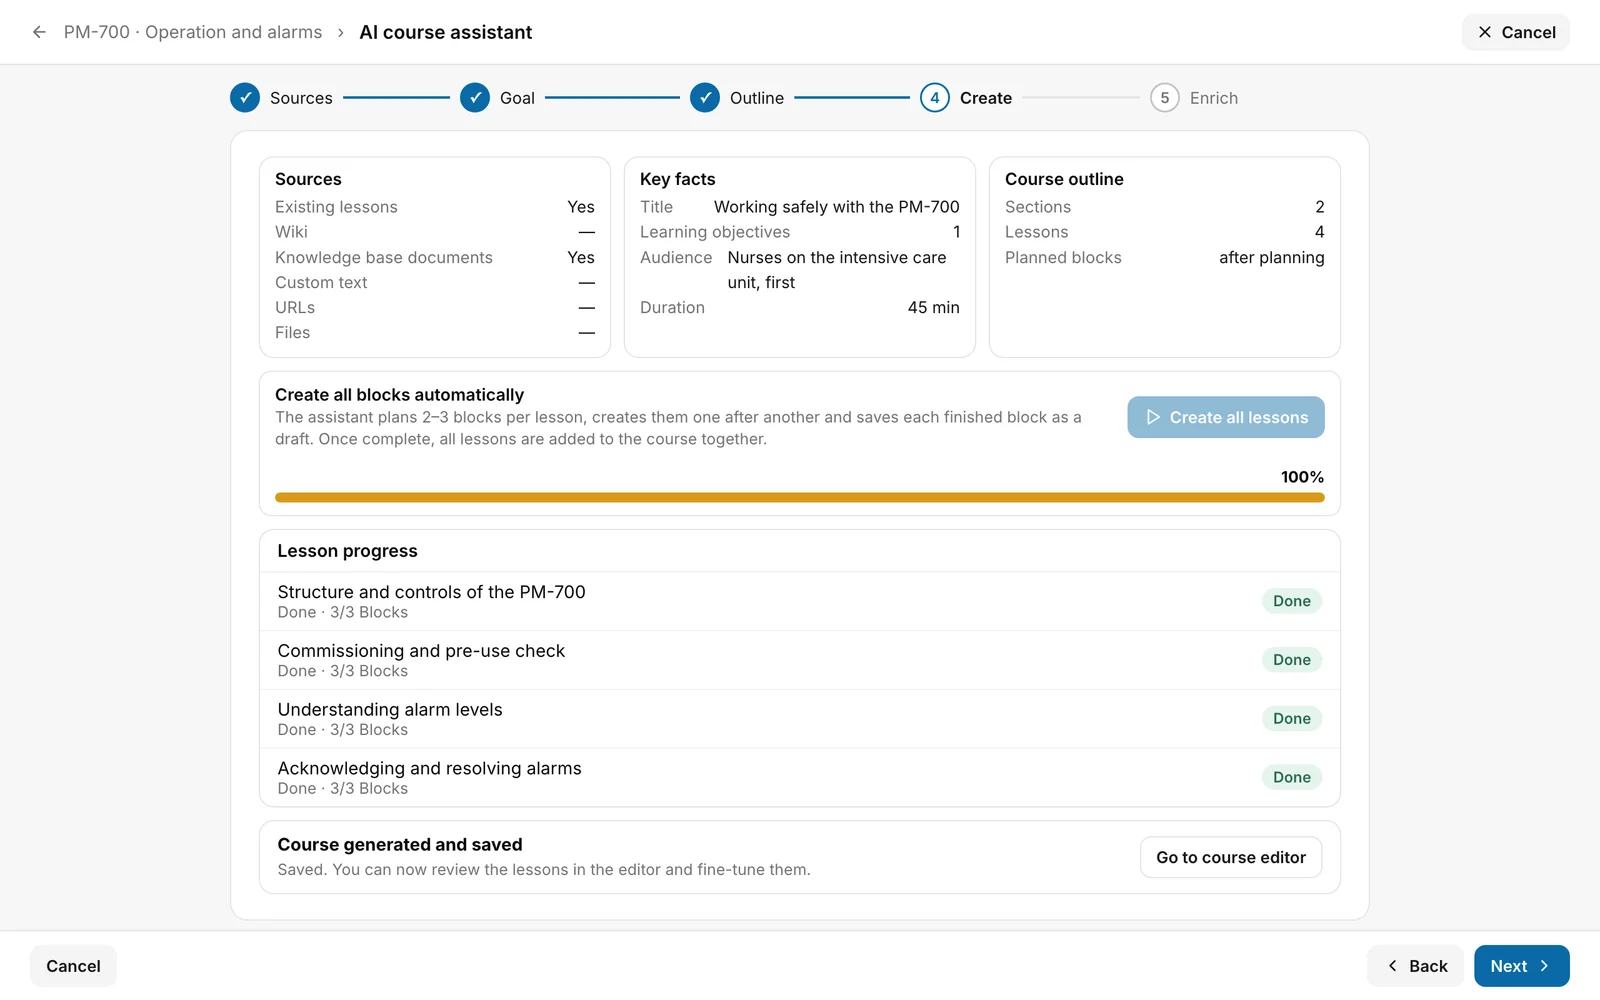
You know it worked when step Create shows Course generated and saved and the course shows the new lessons.
Where the content comes from
AI blocks carry the label AI. Clicking it opens Sources of the AI block with the linked passages of the knowledge base. The evidence applies per block, not per statement. If a block is based only on a pasted text excerpt, no knowledge-base sources are linked. Blocks you write by hand have no source evidence. The app does not check the texts against the sources. You have to do that.
Pause and continue
- There are two Cancel buttons. The one next to the progress display in step Create (only while it runs) stops creation after the running block. Finished blocks stay saved as a draft. The Cancel at the top and bottom of the assistant asks Discard draft?. With Yes, discard you delete your entries in this browser.
- If you leave the page while it runs, the app asks Creation still in progress. With Pause and leave, creation pauses after the active block.
- When you come back later, the assistant asks Resume or start over?. Continue creates only the missing blocks. It only appears as long as sources, key facts, scope and outline are unchanged. If you change something, Create all lessons starts from the beginning.
- If the course changes during the run, also through you in a second tab, nothing is overwritten. The AI blocks stay saved. Apply AI draft asks once more Replace the current course draft?. Then the blocks replace title, description and lessons of the course. Other people’s changes to them are lost. No blocks are created again.
If it does not work
| Message | What it means |
|---|---|
| Please fill in required fields | This is a hint on the disabled Next, not an error. In step 2 the title, audience or learning objective is missing, in step 3 there is no lesson yet. |
| This workspace has used up its AI credit for this month. | The monthly credit is used up. There are also messages for the contract year (“This workspace has used up its AI credit for the contract year.”) and for missing credit (“No valid AI credit is currently set up for this workspace.”). Contact your administrator. Finished blocks stay saved. |
| The connection to the server was interrupted. | Creation stopped. Carry on with Continue. This message also appears for an unknown error. |
| The lesson plan could not be created (error …). | Even the planning failed. Try again. |
| A block for “…” could not be created (error …). / The AI did not finish a block for “…”. / The AI response for “…” did not contain a block. | A single block failed. Choose Continue. |
| “…” could not be saved (error …). | A lesson could not be saved in the draft. Choose Continue. |
| The request to the AI for “…” was too large. / “…” is too large to save. | The size of the request to the AI or of the lesson when saving is too large. Shorten the sources or the lesson. |
| The course has not been updated yet. Created blocks remain saved. Use “Continue” to try again. | This is an addition after one of the error messages above. No lesson is finished yet. Blocks already created are saved. |
| n finished lessons are saved as drafts. Use “Continue” to create the remaining ones. | An addition after an error message when some lessons are already finished. |
| The course has been changed in the meantime. Nothing was overwritten. The AI blocks remain saved. You can decide whether to apply the saved AI draft. | The course changed during the run. Decide with Apply AI draft. |
| The active AI request is still running on the server. Wait a moment, then choose “Continue”. Saved blocks are reused. | An earlier request has not finished yet. Wait a moment. |
| AI suggestion failed. Please try again. | Prefilling in step 2 failed. The fields stay as they were. |
Checked on 6 November 2026 against the current Fracto release.